Creating a leave or PTO request process
- Calculate the total number of days requested from a table
- Create a dataset to track annual leave requests
- Connect the dataset to the form with a lookup field
- Displaying available balance as a number field
- Restrict a request based on the days available
- Update the values in the dataset after approved leaves
- Refresh fields while submitting
- Configuring refresh fields
- Live form
One of the most common processes to create in Kissflow is the Leave Request or Paid Time Off (PTO).
A simple leave request process consists of a form that collects data about how many days the user will be gone, and a workflow with one or two approval steps.
However, you can make this process much more advanced.
Calculate the total number of days requested from a table
A table is a useful way for a user to enter multiple dates they want to request, especially if the dates aren’t consecutive. Here’s an example with a table called Leave Details.

- Each line of the table will create a number value in the field called Leave duration.
- To sum all of these values, create an aggregation field called Total leave days.
- Check the field Aggregate table data in the context of a single item of the process.
- Under Choose a flow to look up, select the table that has your leave information, in this case Leave Details.
- Under Select a field, select Leave duration.
- Under Aggregation type, choose Sum.
Create a dataset to track annual leave requests
One common need is to have a separate dataset that tracks the number of days of leave someone has taken over the course of a year and updates every time someone makes a request.
There is a pre-built dataset called Employee Leave Dataset available in the Kissflow Marketplace, or you can build your own. In the prebuilt dataset there are fields for:
- Employee name will be a text field. Change it to a User field.
- Leave year
- Opening leave balance
- Closing leave balance
- An option to measure leave units in days or hours
Connect the dataset to the form with a lookup field
In your form, create a lookup field called Leave connection. This will be the field that makes the right connection.
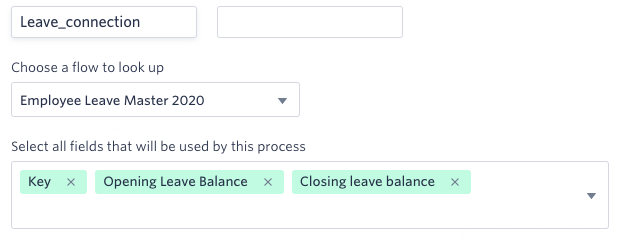
Under Choose a flow to look up, select the dataset.
Then under Select all fields that will be used by this process, you need to select all the fields you plan to use at any time in your form.
Filters
You can apply filters to restrict the values used in the aggregation. In my case, the employee name should be the same as the person filling out the form.
Employee name equal to field created_by.

This field is not required to be seen, so we recommend setting the visibility to Hidden.
Displaying available balance as a number field
Now, create a number field called Available leave balance and add the formula. [Dataset_name.Field_name_in_dataset]. In this case, it is
Leaves_connection.Closing_leave_balance
This will display the current leave balance for the person who's filling out the form.

Restrict a request based on the days available
Here, we want to make sure that someone cannot request more days off than they have available.
In the Available leave balance field, add the validation as Greater than or equal to the field Total leave days.

Update the values in the dataset after approved leaves
In the form, create a number field called Leaves Left and enter the formula - Leaves_connection.Closing_leave_balance - Total_leave_days. This will subtract the total leaves days applied in this form from the closing leaving balance in the dataset.
Once the employee’s leave is approved you may want to update that information in the dataset. Let’s start by creating an integration.
- In your process, click the More options button (
 )> Integrations.
 - Click New Integration, then add a name and description for your integration and click Create.
- Under Send Data, click Start New.
- Under Trigger Settings, select Step trigger.
- Select the workflow step.
- Under Select trigger, select the trigger. In my case, it will be when an item exists this step.
- After setting up the trigger, click the Add button (
) and then Add action.
- Then click on Create and update a dataset record.
- Choose the dataset that has your employee leave information.
- Then map the dataset fields with the fields in the Process. The Employee ID entered in the form will identify the user to the Key field in your dataset. Then the value in the form’s Leaves left field will be updated to Closing leave balance in the dataset.
- Click Done. Remember to Turn On the integration. Click here to learn how to access your integration data.

Refresh fields while submitting
While approving the leave requests, additionally I want to know the total leave requests raised by the employees for this year including the items that are in progress and completed. Let’s create an aggregation field called Leaves taken so far.
- Under Choose a flow to look up, select this process.
- Under Select a field to aggregate, select Total leave days.
- Under Aggregation type, choose Sum.
This field will now calculate all the leaves days that are in progress and completed for the employees. Now let’s see how to refresh this on form Submit.
Configuring refresh fields
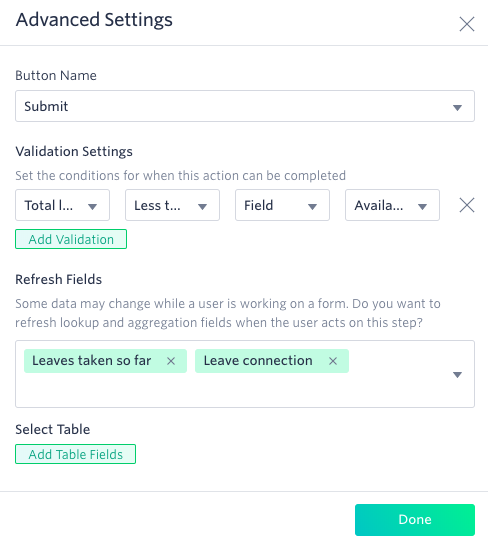
Go to the Permissions tab in the process editor. Select any step and scroll down to the bottom of the form. Click Configure actions. Hover over Submit action and click Advanced.
Under Refresh Fields, choose the required lookup or aggregation fields that need to be refreshed. Select Leaves taken so far and Leave connection. Remember to configure the Validation Settings.
For example, let’s say you have a validation that ensures the leaves requested now amount does not go below the available leaves. This validation ensures if the value does not match with the condition it will not advance to the next step. In my case, Total leaves days should be Less than or equal to field Available leaves and click Done.
Live form
When I try to Submit a draft item, the Leave connection and the Leaves taken so far fields will refresh and display the latest value from the dataset.
